Why does microcement crack? Or why is microcement cracking.
Well if you read it, I’ll tell you that microcement if installed properly will not crack. Let’s dive into it:
Introduction
Microcement has become one of the most popular decorative flooring solutions globally, transforming residential and commercial spaces with its seamless, elegant aesthetic. The market for microcement has grown significantly—valued at approximately $1.2 billion in 2023 and projected to reach $1.8 billion by 2030 (CAGR 6.5%), according to industry reports.
However, despite its beauty and durability advantages, microcement is a delicate flooring system. One of the most common concerns professionals and homeowners face is: when and why does microcement crack?
Unlike traditional tile or epoxy flooring, microcement’s seamless nature makes visible cracks particularly noticeable. The good news? Most microcement cracking is preventable with proper application and substrate preparation—and when it does occur, it’s often repairable.
In this comprehensive guide, I’ll break down the exact causes of microcement cracking, how to prevent it, and proven repair solutions based on 10+ years of professional flooring installation experience.
Understanding Microcement: Why It’s Prone to Cracking
What is Microcement?
Microcement is a thin, cement-based coating typically applied in 2-3mm layers over an existing substrate. It’s composed of:
- Portland cement
- Fine aggregates (sand particles typically 0.1-0.5mm)
- Polymers (acrylic or epoxy-based resins for flexibility)
- Pigments and additives
Key property: Unlike thick concrete floors, microcement’s thin application requires precise curing, moisture control, and substrate stability.
Why Microcement Cracks More Than Traditional Flooring
- Thin application — Only 2-3mm total thickness means any substrate movement magnifies
- Cement-based chemistry — Portland cement naturally shrinks as it cures (typically 0.5-1% linear shrinkage)
- Stress concentration — Any weak point in the substrate becomes a crack point in microcement
- Temperature sensitivity — Concrete substrates expand/contract 0.04-0.05% per 10°C temperature change
Research reference: Studies from Materials and Structures journal (2022) show that thin cement coatings experience up to 3x higher stress concentration than thicker systems.
The 2 Main Categories of Microcement Cracking
As a microcement specialist, I’ve identified that virtually all cracks fall into two distinct categories. Understanding which type you’re dealing with determines the repair approach.
Category 1: Application & Material-Related Cracks (Web-Like Pattern)
What It Looks Like:
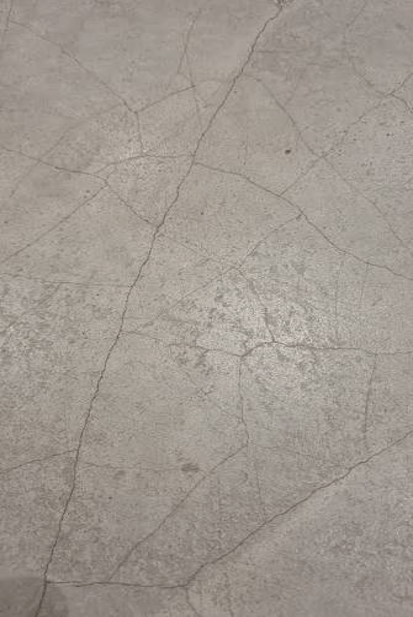
Irregular, web-like or alligator-skin pattern of fine cracks across the microcement surface. These cracks typically:
- Appear within 1-7 days of application
- Are shallow (confined to the microcement layer itself)
- Don’t penetrate to the substrate
- Often form a random network pattern
Root Causes:
A) Improper Surface Preparation
- Insufficient dust removal (dust prevents adhesion)
- Substrate too smooth/not profiled correctly
- Old sealers or contaminants not fully removed
B) Incorrect Mixing
- Wrong water-to-powder ratio (too much water = excess shrinkage)
- Insufficient mixing time (lumps affect curing)
- Using hot water in hot environments
- Mixing with contaminated water
C) Material Quality Issues
- Expired or improperly stored microcement (moisture absorption degrades polymers)
- Using non-certified products (inferior polymer content)
- Batch defects (rare, but occurs with poor quality control)
D) Improper Application Technique
- Applying too thick (>1mm) in single coat (increases shrinkage stress)
- Not allowing proper flash-off time between coats
- Poor roller or trowel technique creating inconsistent thickness
E) Environmental Factors During Curing
- Temperature too low (<5°C) — slows hydration, increases cracking risk
- Temperature too high — dry rapidly, increasing the chances of shrinkage
- Humidity too low (<40%) — rapid surface drying while interior cures
- Direct sunlight or wind — causes uneven drying
- Inadequate ventilation — creates localized dry spots
Category 2: Substrate-Related Cracks (Linear Pattern)
What It Looks Like:
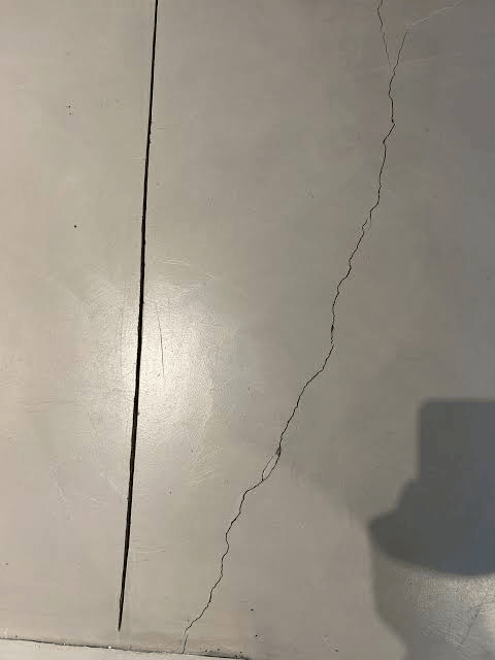
Straight or curved lines running through the microcement, often in patterns that mirror substrate issues. These cracks:
- Usually appear days to weeks after application
- Run through the entire microcement layer into the substrate
- Follow patterns (straight lines, corner cracks, movement lines)
- Indicate structural issues below
Root Causes:
A) Substrate Movement & Settlement
- Concrete or screed settling unevenly
- Thermal expansion/contraction (especially in large open spaces)
- Structural settling of building
- Inadequate substrate curing (screed must cure 28+ days before microcement)
B) Substrate Cracking Transferred to Microcement
- Existing cracks in concrete, screed, or self-leveling compound
- Microcement cannot bridge substrate cracks >1mm
- Old tile substrate with grout line cracks
C) Moisture-Related Issues
- Moisture vapor transmission rate (MVTR) too high (>3 lbs/1000 sq ft/24 hrs)
- Capillary moisture rising from below
- Insufficient waterproofing membrane under microcement
- Substrate moisture >4% (for concrete, should be <85% RH per ASTM F2170)
D) Substrate Preparation Failures
- Substrate not self-leveled (variations >3mm over 3m)
- Poor bonding between substrate layers (tile-to-mortar debonding)
- Substrate too slick (old paint, sealers not removed)
- Substrate integrity compromised (loose tiles, delamination)
E) Insufficient Joint Planning
- Large continuous areas without expansion joints
- No joints at substrate transitions
- Joints not properly sealed
Microcement Cracking: Timeline
Understanding when cracks appear helps diagnose the cause:
| Timeline | Typical Cause | Indication |
| Within 24-48 hours | Improper mixing, temperature, humidity | Application error |
| 3-7 days | Curing stress, shrinkage, rapid drying | Application/environment issue |
| 1-2 weeks | Substrate movement, moisture | Substrate problem |
| 1-3 months | Structural settling, moisture accumulation | Serious substrate issue |
| 6+ months | Thermal cycling, ongoing substrate movement | Design/installation flaw |
How to Prevent Microcement Cracking: Expert Checklist
Pre-Application (Substrate Preparation)
✅ Moisture Testing:
- Perform ASTM F2170 calcium chloride test
- Ensure concrete moisture <4% by weight
- Ensure RH <85%
✅ Surface Profiling:
- Achieve CSP 2-3 (medium profile)
- Use proper grinding
- Remove all dust, loose material, contaminants
✅ Joint Planning:
- Install expansion joints every 25-50 SQM (residential)
- Install movement joints at 50-75 SQM (commercial)
- Place joints at substrate transitions
- Use 3-5mm wide joint tape/trim
✅ Substrate Leveling:
- Variations should be <3mm over 3 meters
- Use self-leveling compound for uneven substrates
- Allow 7+ days curing before microcement application
✅ Waterproofing:
- Apply moisture barrier if MVTR high
- Use epoxy or polyurethane primer
- Allow proper flash-off time
During Application
✅ Mixing:
- Use clean, potable water only
- Follow manufacturer’s water-to-powder ratio exactly
- Mix for 3-5 minutes until consistent
- Let mixture rest 2 minutes, remix briefly (slake time)
✅ Application Conditions:
- Temperature: 15-25°C (ideal range)
- Humidity: 40-60% (optimal range)
- No direct sunlight on work area
- Ensure adequate ventilation
✅ Application Technique:
- Apply in thin coats: 0.25-0.5mm per coat
- Use 2-3 coats minimum
- Allow proper flash-off between coats (typically 4-8 hours, follow product specs)
- Maintain consistent thickness
- Use quality roller/trowel technique
Post-Application (Curing)
✅ Controlled Curing:
- Maintain 15-25°C for 7 days minimum
- Keep humidity at 40-60%
- Avoid foot traffic for 1-2 days
- Avoid water exposure for 3 days
- Keep space adequately ventilated
✅ Sealing Timing:
- Allow microcement to fully cure (typically 12-24 hours)
- Apply primer/sealer per product specifications
- Usually 2 coats of sealer required
Solutions: How to Repair Microcement Cracks
Type 1: Web-Like (Application-Related) Cracks
Repair Process:
- Sand the sealer — Use 120-150 grit sandpaper to remove sealer over cracked area
- Inspect the substrate — Ensure no underlying substrate cracks
- Apply 2-3 repair coats — Use same microcement product, apply thin coats
- Reseal — Apply 2 coats of sealer over repaired area
- Blending — May need to reseal larger area for color consistency
Cost estimate: $150-500 per 10 SQM (depending on severity and labor)
Time estimate: 3-5 days (accounting for curing time)
Success rate: 95%+ (if cause was truly application-related)
Type 2: Linear (Substrate-Related) Cracks
Repair Process (More Complex):
- Root cause repair — Must fix underlying substrate issue first
- Fill substrate cracks with epoxy or polyurethane injection
- Or cut out and re-level affected area
- Full area restoration — Remove all sealer over affected section
- Microcement reapplication — Apply 2-3 full coats over entire section
- Resealing — 2 coats of sealer
- Feathering — Blend with surrounding microcement for seamless look
Cost estimate: $500-2,000+ per 10 SQM (depending on substrate repair complexity)
Time estimate: 7-14 days
Success rate: Depends on permanent fix of substrate issue
Prevention Strategy: The Joint System Solution
Based on 10+ years of professional experience, the most cost-effective prevention is installing movement joints during initial application.
Residential Applications:
- Install trim/joints at all door thresholds
- Use decorative trim for aesthetic appeal
- Creates natural break points for maintenance
Commercial Applications:
- Install movement joints every 25-50 SQM in grid pattern
- Use anodized aluminum or stainless steel trims (professional appearance)
- Provides easy panel replacement if future cracking occurs
Advantages of Joint System:
✅ Cost reduction — Future repairs only affect 25-50 SQM panel instead of entire floor
✅ Aesthetic control — Trims can enhance design
✅ Easy maintenance — Single panel recoating is faster and cheaper
✅ Longevity — Reduces stress on larger continuous areas
Example: Office with 500 SQM continuous microcement:
- Without joints: One crack = $2,000-5,000 repair for entire floor
- With joints (50 SQM panels): One crack = $200-500 repair for single panel
FAQ: Common Questions About Microcement Cracking
Q: Can microcement crack in hot climates?
A: Yes, both extreme heat and rapid temperature fluctuations increase cracking risk. Thermal expansion of concrete substrate (0.04-0.05% per 10°C) creates stress. In hot climates, ensure:
- Adequate expansion joints (25-50 SQM max)
- Substrate moisture control
- Slow curing (avoid direct sun during first 7 days)
Q: How long before I can walk on new microcement?
A: Allow 2-3 days foot traffic-free minimum. Some products cure faster; check specific product guidelines.
Q: Is microcement waterproof?
A: Properly sealed microcement is water-resistant but not waterproof. It can handle wet areas (bathrooms, kitchens) but not constant water immersion. Use waterproof sealers (2-3 coats recommended).
Q: Can I repair a cracked microcement floor myself?
A: Web-like cracks can be DIY-repaired if you’re experienced. Substrate cracks require professional assessment. Always test on a small area first.
Q: What’s the lifespan of microcement?
A: With proper installation and maintenance, 10-15 years in residential use, 5-10 years in high-traffic commercial areas. Cracking can occur at any point but is preventable.
Q: Does microcement crack more than epoxy flooring?
A: Microcement is more prone to visible cracks than thick epoxy, but less prone than polished concrete. The difference is visibility—a thin 2mm crack in microcement is obvious, while the same crack in 3mm epoxy may not be visible.
Key Takeaways
- Most microcement cracking is preventable with proper surface prep, mixing, application conditions, and curing environment
- Two distinct crack types exist:
- Web-like cracks (application issues) = solvable with microcement recoating
- Linear cracks (substrate issues) = requires substrate repair first
- Prevention beats repair:
- Cost of prevention (joint installation): $200-500
- Cost of repair: $500-2,000+
- Joint systems are investment in longevity — especially for commercial applications 25-50 SQM panels reduce future repair costs dramatically
- Professional installation matters — substrate prep, mixing precision, and environmental control during curing are critical
Next Steps: Protect Your Investment
If you’re planning a microcement floor:
- Hire professionals with proven track records
- Demand moisture testing on substrate
- Specify joint placement in design
- Request detailed curing protocol
- Choose quality sealers (polyurethane or acrylic-based)
If you already have a cracked microcement floor:
- Identify crack type (web vs. linear)
- Get professional assessment
- Address root cause before repair
- Use quality repair materials matching original product

 Your Guide on Specialised Flooring
Leave a comment